
Componentes y suministros
 |
|
× | 1 | |||
 |
|
× | 1 | |||
 |
|
× | 1 |
Aplicaciones y servicios en línea
 |
|
Acerca de este proyecto
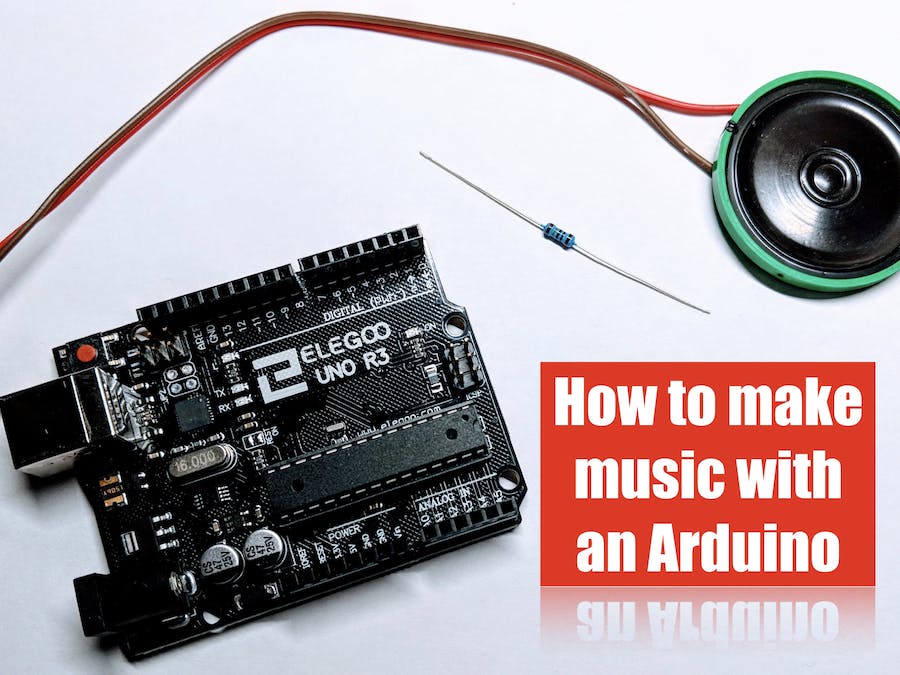
En este video explico cómo puedes usar un Arduino para hacer música usando solo un parlante y una resistencia.
Como muchos proyectos similares, este genera sonidos que corresponden a las notas de un piano. Sin embargo, a diferencia de muchos de estos proyectos, este no utiliza una tabla de búsqueda para obtener las frecuencias. En su lugar, los tonos se generan mediante un cálculo. El cálculo acepta un número del 1 al 88. Este número corresponde a una tecla en un piano de 88 teclas.
La biblioteca Arduino proporciona una función de tono () que se puede usar para generar tonos cuadrados, pero esta función no puede generar tonos por debajo de 31 Hz. Un piano de 88 teclas tiene algunas notas con frecuencias por debajo de los 31 Hz. Por lo tanto, si desea generar el rango completo de notas de un piano de 88 teclas, no puede usar la función tone(). En su lugar, le mostraré cómo generar tonos de onda cuadrada usando un retardo simple.
Este proyecto opera a escala de microsegundos. Un microsegundo es una millonésima de segundo. Este proyecto hace un uso extensivo de la función delayMicroseconds() de la biblioteca Arduino, pero hay otro problema menor allí, porque no puede retrasar de manera confiable más de unos pocos miles de microsegundos, lo que a veces tiene que hacer este proyecto, así que les mostraré cómo superar eso también.
Una última cosa sobre este proyecto es que, a pesar de los problemas descritos anteriormente, el código del proyecto es realmente bastante pequeño, ya que el código cabe prácticamente en una sola pantalla (¡su resolución puede variar!). Para ser justos, no tiene ningún comentario de código, pero hay un enlace al código completamente comentado disponible en la descripción del video.
¡Espero que te guste este proyecto!
Cómo instalar Arduino IDE en Ubuntu
codificado
Código de proyecto
/*
 * Copyright 2018 Code and Make (codeandmake.com)
 *
 * Permission is hereby granted, free of charge, to any person obtaining a copy
 * of this software and associated documentation files (the "Software"), to deal
 * in the Software without restriction, including without limitation the rights
 * to use, copy, modify, merge, publish, distribute, sublicense, and/or sell
 * copies of the Software, and to permit persons to whom the Software is
 * furnished to do so, subject to the following conditions:
 *
 * The above copyright notice and this permission notice shall be included in
 * all copies or substantial portions of the Software.
 *
 * THE SOFTWARE IS PROVIDED "AS IS", WITHOUT WARRANTY OF ANY KIND, EXPRESS OR
 * IMPLIED, INCLUDING BUT NOT LIMITED TO THE WARRANTIES OF MERCHANTABILITY,
 * FITNESS FOR A PARTICULAR PURPOSE AND NONINFRINGEMENT. IN NO EVENT SHALL THE
 * AUTHORS OR COPYRIGHT HOLDERS BE LIABLE FOR ANY CLAIM, DAMAGES OR OTHER
 * LIABILITY, WHETHER IN AN ACTION OF CONTRACT, TORT OR OTHERWISE, ARISING FROM,
 * OUT OF OR IN CONNECTION WITH THE SOFTWARE OR THE USE OR OTHER DEALINGS IN THE
 * SOFTWARE.
 */

/*
 * A simple project that demonstrates how to make music using an Arduino.
 *
 * This code accompanies the following tutorial: https://youtu.be/Z1YvIFUIhLs
 */

// Pin to which an 8 Ohm speaker is connected (use a 150 - 220 Ohm resistor)
#define speakerPin 12

// Tempo (beats per minute)
#define bpm 96

// Gap between notes. This is expressed as percentage of time between 2 beats.
#define noteGapPercentage 10

/*
 * 2D array containing the notes to be played
 * A note comprises of two values:
 *  * The first value determines the frequency of the note.
 *    This is expressed as the number of a key on an 88-key piano (1 - 88)
 *    A number outside this range can be used (e.g. 0) to create a gap
 *  * The second value determines the duration:
 *    * 1 represents a whole note (spans 4 beats)
 *    * 2 represents a half note (spans 2 beats)
 *    * 4 represents a quarter note (spans 1 beat)
 *    * 8 represents an eighth note (spans 0.5 beat)
 *      etc.
 */
uint8_t notes[][2] = {
  {35,4}, {35,4}, {42,4}, {42,4}, {44,4}, {44,4}, {42,2},
  {40,4}, {40,4}, {39,4}, {39,4}, {37,4}, {37,4}, {35,2},
  {42,4}, {42,4}, {40,4}, {40,4}, {39,4}, {39,4}, {37,2},
  {42,4}, {42,4}, {40,4}, {40,4}, {39,4}, {39,4}, {37,2},
  {35,4}, {35,4}, {42,4}, {42,4}, {44,4}, {44,4}, {42,2},
  {40,4}, {40,4}, {39,4}, {39,4}, {37,4}, {37,4}, {35,2}
};

// Time between two beats in microseconds (equal to length of a quarter note)
#define beatDuration (60.0 / bpm) * 1000000L

// Time of the gap between two notes in microseconds
#define noteGap beatDuration * (noteGapPercentage / 100.0)

void setup() {
  // Set the speakerPin as an output
  pinMode(speakerPin, OUTPUT);

  // Iterate over the notes array
  for(int i = 0; i < (sizeof(notes) / sizeof(*notes)); i++) {
    // pass the key number and note type
    playNote(notes[i][0], notes[i][1]);
  }
}

/*
 * Plays an individual note.
 *
 * keyNumber - The key number (1 - 88)
 * noteType - The note type (1, 2, 4, 8, etc.)
 */
void playNote(uint8_t keyNumber, uint8_t noteType) {
  long halfPeriod = getPeriodForKey(keyNumber) / 2;
  long noteDuration = beatDuration * (4.0 / noteType);
  long elapsed = 0;

  // While we have a note to play
  while(halfPeriod > 0 && elapsed < (noteDuration - noteGap)) {
    // Set speakerPin high for half of the period
    digitalWrite(speakerPin, HIGH);
    wait(halfPeriod);

    // Set speakerPin low for half of the period
    digitalWrite(speakerPin, LOW);
    wait(halfPeriod);

    // Update the amount of time that has elapsed
    elapsed += halfPeriod * 2;
  }

  /*
   * Gap between notes. Calculated using 'elapsed' to minimise timing errors
   * and ensure that the correct gap occurs whenever getPeriodForKey() returns
   * zero.
   */
  wait(noteDuration - elapsed);
}

/*
 * Returns the period for a key or zero for key numbers outside the range of 1 -
 * 88.
 *
 * keyNumber - The key number (1 - 88)
 */
long getPeriodForKey(uint8_t keyNumber) {
  // If the key is between 1 and 88
  if(keyNumber >= 1 && keyNumber <= 88) {
    // Return the period (one second divided by the frequency of the key)
    return 1000000L / (pow(2.0, (keyNumber - 49.0) / 12.0) * 440.0);
  }

  // Otherwise return zero
  return 0;
}

/*
 * Delay for a number of microseconds. This is necessary because
 * delayMicroseconds() has an upper limit.
 *
 * us - The delay in microseconds
 */
void wait(long us) {
  // First delay for the number of whole milliseconds using delay()
  delay(us / 1000);
  // Then delay for the remainder of microseconds using delayMicroseconds()
  delayMicroseconds(us % 1000);
}

void loop() {
  // Not used. Music will play once.
}
diagramas

Por favor inicie sesión o regístrese para comentar.